
Monthly cost sharing and common mistakes
To share costs, navigate to the "Cost division" module and select the property for which you want to distribute the costs.
The eequirement for cost sharing is that all meter readings are entered.
1. ENTERING METER READINGS
- From the top menu, select the “Readings” tab.
- You can enter readings either manually or via Excel import.
- For manual entry: Select Enter Readings > Enter Manually > Choose the period (by default, the previous month) > Continue > Fill in the “Final Reading” or “Quantity” columns > Save
For Excel import:
- Select Enter Readings > Upload File
- Choose the period (default is the previous month) > Continue
- Download the template
- Fill in column F with final readings
- Save the file and upload it to the open window in Hausing > Continue
- Refresh the page to confirm if all readings were submitted.
Important:
- If you see a red "Tenant Change" button, click it to record readings for a tenant who moved out mid-month.
- For direct meters, specify the start and end readings or distribute consumption by rental days.
- For shared meters, you can choose to distribute usage:
- By area (proportional to tenants' square meters)
- By custom consumption input for each area
- Equally among tenants
2. COST SHARING
- Open the "Cost dividing" tab to view the cost distribution table.
- Shareholders: Displays how many units or meters are included in the distribution.
- Price: Enter the cost for the selected month. Check if you need to enter the unit price or total invoice amount.
- Total quantity: Displays the total units being distributed, e.g., m² for area-based distribution or kWh for electricity.
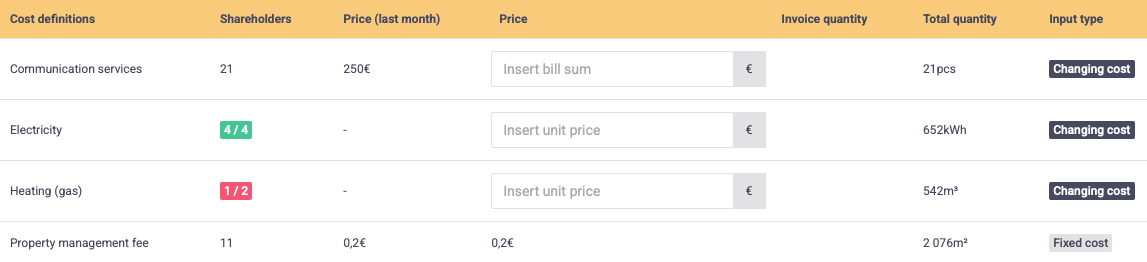
- Enter unit prices or invoice totals in the "Price" column and click "Divide Costs".
- Costs without a price or without meter readings (marked with a red box in the “Participants” column) will not be distributed.
- To view distributed costs, select “Divided costs” (this view opens automatically once all costs are distributed).
- In the Distributed Costs Table you see entered prices and how much was allocated to each tenant and view the owner's share of each cost.
NB! The "Total" row shows the total amount distributed among tenants. This may differ from the invoice total due to calculation/rounding settings. Costs are always distributed so that multiplying units by unit price matches the total invoice.
- Adjustments: to change cost settings, click the gear icon (top right). To adjust participants, select "Participants" (top left).
3. GENERATING INVOICES
- Click "Generate Invoices" at the top right, or if some expenses remain unshared, click the arrow next to the "Divide costs" button.
- Enter the required dates.
- Invoices will start generating and will appear in the "Invoices" menu under the chosen building. Refresh the page if all invoices haven’t appeared yet.
- To verify that all invoices have been generated, go to Cost division > Select Building > Shared costs. If there’s a document icon next to the tenant’s name, an invoice has been created for them.

Note: Invoices and rows with a zero total will not be generated.
4. COMMON ERRORS
To view the errors hover your mouse over any exclamation marks or the word "Error" for details.
- Tenant change information missing - meter-based costs cannot be shared without recorded tenant changes. Click the red "Tenant change" buttons and finalize how readings are split.

- Room has overlapping contract entries - lease periods overlap for the same unit (e.g., if one lease/room ends on 20.01.2025, the next should start on 21.01.2025, not on the same day). You can change it it contracts. Read a manual on how to change lease dates here.